Showing posts with label Case Study. Show all posts

Tuesday, February 14

Product Spotlight: Robern AiO Cabinet


How does technology into the bathroom? There are lots of ways to incorporate technology into the modern bathroom, and one of my favorite ways as with the Roeburn AiO cabinet. Both the medicine cabinet and light source in one, this dual function product is sure to wow.

Lighting
The Robert AiO cabinet features two LED light strips down either side of the cabinet. These light strips are the perfect task light for the bathroom. They equally light up either side of the users face for use when shaving and applying make up. Think of back stage lighting. Those light bulbs lined up along either side of a mirror. This is the LED solution from Robern. The AiO cabinet features an easy to use touch pad under the right light strip which can adjust brightness and turn the light on and off. There is also a small light bar on the interior of the cabinet that lights up when the door is open. Making it easy to find the SleepQuil when your insomnia is keeping you up.


Power
The Rober AiO cabinet also features a few outlets on the interior of the cabinet. Two USB and a 110 outlet means you can charge what you need to. If you a lucky enough to have a Kohler Moxie, you can charge it and your phone right from your medicine cabinet. It also features the one standard outlet, which is perfect for an electric toothbrush, razor, or anything else you want plugged in.

Options
The AiO cabinet has a ton of options. First, you can select from a single door cabinet or a double door cabinet. Here are also several width and height options. The AiO cabinet only comes in four inch depth, but it can be recessed into the wall or surface mounted, with an additional kit.

The AiO also features a handy magnetic doc which is perfect for those smaller items, such as tweezers and nail clippers. When paired with adjustable glass shelves, and interior mirrors and a magnifying mirror, this is definitely a go-to for any medicine cabinet. These cabinets can be banked together for smaller bathrooms, maximizing space and functionality.

Monday, December 7

The Golden Revision


Many of us who have a 1980's and 1990's house have the same thing. Outdated and ugly brass fixtures.  We all have them, we all hate them, and we all want to replace them.  Especially now that they are probably showing their age with tarnishing and deteriorating finishes, leaks, and oxidation.  It's ok, we should all know we aren't alone.

Today's finishes aren't limited to Chrome and Brushed Nickel.  For those of you that still love the warmth and class that Brass once showed, there is still something perfect for you.  There are still golden finishes that are gaining in popularity. (I guess everything does come back around at some point!)  Here are some of my favorite finishes that are perfect for people who love the gold finishes, or who are on top of the fashion game!

This faucet is Brushed Bronze.  Similar finishes are available from many well named brands, including Kohler, Delta, Brizo, Newport Brass, Altman's, and many more.  This finish is available in both kitchen and bath. Brushed Bronze is a darker version of a golden finish.  It is warm, and goes well with cream colored finishes.

Here it is again in a kitchen faucet.  This particular faucet is the Kohler Karbon Articulating Faucet, which list at around $1500.  This finish is truly a way to make a statement.  It hasn't grown widespread like Brass did in the 80's and 90's, and like Brushed Nickel has in the 2000's and 2010's.  Because of so many finish offerings today, I don't think it will be come so widespread, so you can really make a statement and have something unique.


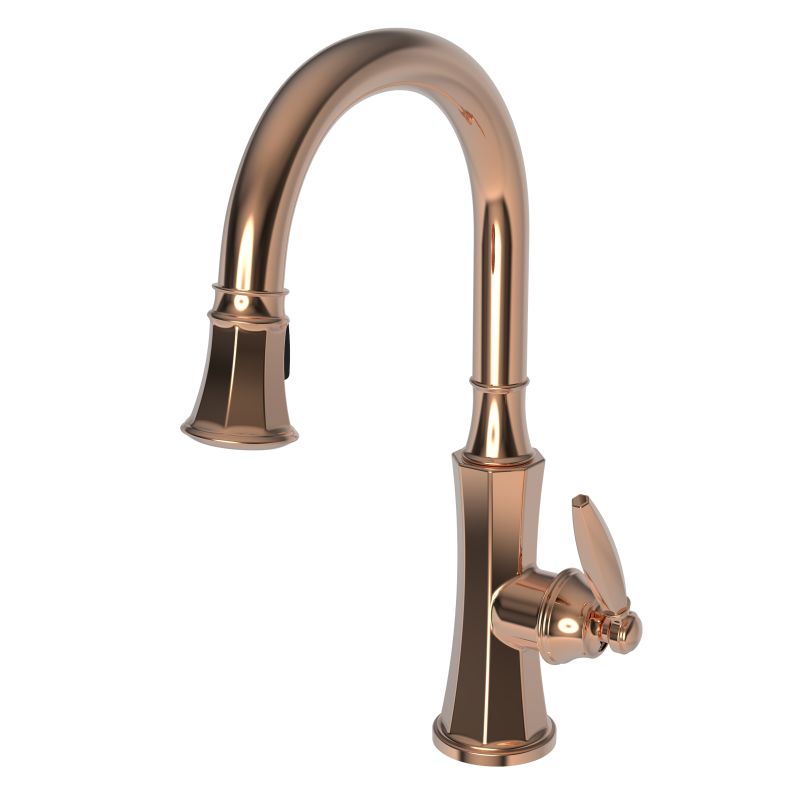
This Polished Copper faucet by Newport Brass is called the Metropole. I very popular design, in a unique finish to Newport Brass.  It looks just like a shiny new penny. This faucet is priced from around $1207. Many of Newport Brass's faucet offerings are available in this finish, which is again, a warm and unique finish.  One thing I dislike about chrome is that it can be so cold.

Newport Brass has the largest selection of gold finishes including Polished Copper, Brushed Bronze, French Gold, Polished Brass, Brushed Brass, and so much more. Newport Brass also has a wide variety of faucet designs, and nearly all faucets are available in all 27 finishes.  They are typically made to order, which makes them the best way to customize your faucet.  They have a full array of faucets including bath, kitchen, shower, and accessories to coordinate your whole home.

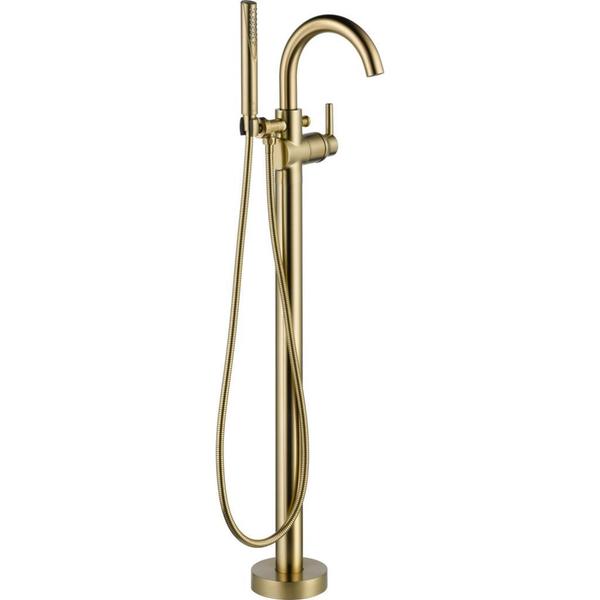
Delta Trinsic Floor Mount Tub Filler in Champagne Bronze
And this last faucet is the Delta Trinsic Floor Mount Tub Filler in Champagne Bronze. I love the mix of Traditional finishes with contemporary faucet design.  This is a great way to create a custom space.  Why stick to the same old boring Brushed Nickel if you don't want to. Like Newport Brass, Delta has a full variety of coordinating faucets and accessories to match your whole home.

Most people can't wait to get rid of their outdated gold faucets.  Some people still love the gold, if that's you, rest assured, you will find something to fit your taste.  Traditional, contemporary, and transitional styles are available in these fun new finishes.  And if you shop with the major brands, you can create a whole suite of fixtures and accessories to make a complete space.


Monday, July 27

Trends 2015 : Kitchen

I woke up this morning thinking of the new trends in kitchens today.  There are so many beautiful and amazing products out there, and a mesh of styles that is harmony in design.  I decided to write this post.  Putting forward this mesh of Industrial Design with a Luxe Transitional feel.


So lets start talking about these products.  The new kitchen trends are leaning more toward these grey/beige/green tones, which is exactly what Benjamin Moore's Antique Jade is.  Want less green?  Then look no further than Halo, a perfect mix of grey and beige.  These soft colors are a great way to add warmth, and also brighten up a space.

For this kitchen mood board, I decided to take the Crystal Cabinetry Downing Way Raised Panel cabinet door, painted with Benjamin Moore's Halo. This is a great "Transitional" styled door, featuring clean lines, a slab drawer front, and a simple raised center panel.  Current cabinet trends include off white cabinets that ditch the glaze.  A crisp and clean look that isn't so stark and institutional.    The flat slab drawer head allows for an easier to clean design, which many home owners are looking for.  It also lends itself to a more decorative cabinet pull, which will add interest to the space.

For cabinet hardware, I am loving the Charlie Collection by Alno Inc.  The coloring I have chosen is Polished Nickel.  This color add's that little bit of Luxe to the space.  Chrome is too cold.  Polished Nickel is rich, luxurious, and warmer than chrome.  A major player in plumbing fixtures and hardware these days.  This specific cup pull is absolutely gorgeous.  It's simple design with just a little frill at the edges.

The knob is not too shabby either.  They have back plates for these knobs as well, for the more traditional installation.  These knobs, again, super simple, with just a little bit of detail on the edge.

This collection is available in many finishes, so even if you don't love Polished Nickel as much as me, you will still be able to find a color that you do love.  Some of the finishes include Brushed Nickel and Rubbed Bronze, which are two of the most common kitchen hardware finishes today.

For the faucet and sink, I have chosen a more Industrial looking faucet, with the beauty and traditional styling of a bridge faucet.  The Artesso faucet by Brizo. This faucet, also available in Polished Nickel and other popular fixture finishes, is an industrial take on a traditional style.  It features a side pull out spray, and a beautiful bridge design.  The Artesso family also features a standard Pull Down faucet with or without SmartTouch Technology, a prep/bar size faucet, and a matching soap dispenser.  Brizo has also launched a brand new style of faucet in this family.  Their Articulating Artesso Faucet, which is a unique and fully adjustable faucet.  I am still waiting to see what consumers think about this faucet.  I like the idea and the design, but not sure how it will work out in the real world.

When this faucet is paired with the Rohl Fireclay Apron Sink, you have the link between classic designs and modern industrial styles.  It is blended perfectly and looks absolutely stunning.

Tiling this design element is the best part.  Since everything is so simple, I wanted to bring in that intricate design through the hard surfaces, like a tile splash and the tile flooring.    The Walker Zanger Sterling Row Chesterfield in Linen Mosaic Tile is a heavy use tile suitable for flooring installation including heavy traffic and exterior surfaces, so it is a perfect material for the back splash in this kitchen, but can double as a splash and flooring tile.

I love the laser cut design, which creates that luxurious look bringing in textures and patterns.  The darker tiles in this design feature a wood look which brings in more warmth and supplements the missing texture from the painted cabinets.

Finally, this industrial styled light by Moda Lighting adds a second metal finish.  The Edison style bulb also adds to that industrial style, tying back to the faucet.  Many designers don't like mixing metal finishes, but like jewelry, mixing metal finishes in a room has become a new trend, and I hope this trend never goes away.

The many styles in this room, luxe, transitional, industrial, traditional, contemporary.  There is not specific style, but it all blends together seamlessly creating the kitchen that is today.  It is a mix on a classic, and hopefully will be around a long time.  Luxurious and timeless elements mixed with industrial elements.  I love it, and love creating it in people's homes.


Monday, June 29

Understanding Cabinet Pricing

I want to start this post out by saying that I wish the cabinet industry would stop the insanity. They all post this starting at price for a 10×10 kitchen, and all consumers see is the price. First of all, no one actually has a 10×10 kitchen (and if you do I apologize), and second of all, no one actually buys that "Starting At" kitchen.

Lets get the basics and the common sense out of the way. When they say a 10×10 kitchen is "Starting at $6,495" they are saying the same thing as Ford saying a Focus starts at $6,495". Yes, you can buy at that price but guess what, no automatic door locks, no A/C, manual windows (whats that?), no power steering, you get the picture right? Who wants that car? Manual windows?  Do kids these days even know how to operate a manual window?

So lets get back to cabinets. First and foremost,  that 10×10 price, ignore it, forget it even exists. Even if your kitchen is 10×10, you still need to ignore it. It is even less realistic than that Ford Focus we were talking about. I like you focus on the actual linear footage. This is the price per foot of a specific door style from any specific manufacturer.

Lets say we are going to have a 12×15 kitchen with a 6' island, cabinets on both sides. This is 39 linear feet of cabinets.  (Double the size of that 10×10 kitchen, but falls in the more realistic average of 175-200 s.f. kitchen). From my experience, I am going to say the low to medium end door at Home Depot and Lowes is somewhere around $200/linear foot. So 39 x 200 = $7800. That's not too bad right? Again, this is that stripped down Ford Focus we were talking about. You want to add a that Greige paint you fell in love with? Add 12-15% ($1,170) and you definitely want All Plywood Construction, add another 12-15%, now your at over $10,000 and we haven't even begun to add moldings, glass doors, roll out trays, a waste basket or two, and those super huge pot and pan drawers you have been dreaming about. My general rule of thumb, is to DOUBLE or even TRIPLE that linear foot pricing.

That's right, to get most of the common upgrades your going to want to double, so $15,600 is a more realistic price to that same $6,495 kitchen.  If you want to go all out, with upgrades, accessories, and finishes, you should triple the figure. It all depends. There is no way to say "How much does a kitchen cost?" Everyone's wish list and taste is different, even if they have the exact same kitchen layout. I have never designed the same kitchen twice. Well, I have had two neighbors with the exact same floor plan pick out the exact same cabinet and the price was still several thousand different. Why? The wishlist and what each one wanted was different.  I designed two kitchens for a builder for the same floor plan, still went two totally different directions on style and the price was equally drastically different. 

So like I said. There is no answer to the age old question, "How much does a kitchen cost" question. But there is a good way to you to take matters into your own hands, and estimate.  A way for you to look at different cabinet companies and get a better feel at if you can afford to upgrade. Stop looking at the 10×10 number however, and start looking at the linear footage pricing instead. You will be less likely to set yourself up for extreme sticker shock later, and save the time of your kitchen designer and cabinet maker.  

Monday, September 29

5 Temporary Kitchen Essentials for your Remodel


I have said it more than once.  Most people only experience a full blown kitchen remodel once in their lifetime, and have no idea what to expect.  So when you start setting up your temporary kitchen, what do you do?  What do you need to keep out?  What can you live without, and what is an absolute must.  Where would you even begin?  Here are some basics, because after all, eating out at McDonald's every night is going to get expensive!
  1. Microwave - Today's microwaves can be a great all in one cooking device, especially convection styles that can bake any casserole your family could want.  Some even come with a steam setting which can steam veggies in just a few minutes.  (I use this feature on mine weekly!)  So your temporary kitchen should include a microwave.  If you are concerned about the microwaves and your families safety, then look into a toaster oven.  If you have an over the range model, do not use it in your temporary kitchen.  They often pull too much energy, and have a slanted bottom, causing them to be dangerous, and to trip a breaker.  If the only microwave you have is an over the range type, take a trip to target or Home Depot and get a cheap counter top microwave.  A good sized unit will cost you around $100, and you may even be able to donate it after the remodel.
  2. Toaster Oven - Not your regular toaster.  Toaster ovens can act like a mini oven, making small casserole's, baking chicken or whatever you need your oven to do.  They are small and usually inexpensive.  A great alternative for the microwave-free family.  (I got my toaster oven at CVS for less than $20, so seriously, not a huge investment!)
  3. Coffee Maker - Ok, so everyone enjoys a good cup of "wake up juice" but you can also use the coffee maker to generate hot water for anything.  Even getting a head start on boiling potato's or macaroni and cheese for the kids.
  4. Camp Stove - If you don't have a bar-b-q, then a camp stove is a great investment.  Fry up some yummy taco's.  You can also use it with that hot water from the coffee maker when making that mac n cheese, or mashed potato's. I got my camp stove at Home Depot for under $80, and it uses those little mini propane tanks.  We got through two summers on one mini tank, so it shouldn't cost you too much to keep it going.  
  5. Keep it Simple - Keep clear bins labeled with cookware and utensils, spices and pantry essentials.  It will help make your life easier when looking for that one wooden spoon you kept handy, or the spices. It is also a highly frustrating time for any family to live through, so the simpler you keep it, the better for everyone involved. 
Obviously a Refrigerator is a must, so hang on to that old fridge and keep it out of the way of work.  You can use it to keep the cereal milk nice and cold.  I have also had clients tell me they keep the kitchen project schedule handy, so they can "count down the days" until they get to cook for the first time.  A light at the end of the tunnel if you will.  I also recommend not tearing out the old kitchen until the new cabinets have been delivered and are ready to go in.  Avoid any extra delays.  If a cabinet comes in damaged, why spend that extra few weeks without a kitchen?  

Friday, September 26

Metallic Leather


Custom Brushed Metallic Beaver Meadow Brown Leather
on Chairs at the Langham Hotel in Atlanta, GA
Designed by Johnson Studio
Metallic's are a lot of fun, and a great way to bring in some extra texture into any space.  Sometimes they can be a little scary, and easy to overdo, but still fun.  I was surfing Pinterest not too long ago, and found some products that I have since fallen in love with.  The company in question is Townsend Leather, and their product line is absolutely stunning.  They specialize in all kinds of leather, but have a great collection of metallic finished leathers for interior design and fashion.  Their collection of embossed leather features several different metallic and foil finishes, that lets just say, I was rather excited to order some samples.  

Color: Silver
Pattern: La Scala Damask
Number: L-RD-1875-LAS
The first piece that caught my eye was the Razzle Dazzle Cowhide in La Scala Damask Silver.  I could see this textured and shiny leather featured on throw pillows, or even an upholstered headboard!  This particular design is not recommended for heavy use areas like seating, but great for accents or vertical applications, as the metallic foil can wear. 

The physical sample is just as beautiful as the photo, and the textured detail is absolutely stunning.  No trick photography here, it looks great, even at a distance.  I often worry about some of these textured materials because when entering a room they can often take two or three glances to actually get what's going on, but not this one.  


Color: Silver
Pattern: Ostrich
Number: L-EFAB-1875-LAS
One of the other leathers that instantly caught my eye was the Fab Foils Embossed Silver Ostrich on Cowhide.  This highly metallic leather sample took my breath away right out of the envelope. It almost looks like a piece of foil, so shiny and bright.  I already have a few projects I could use this for.  Like the Razzle Dazzle Cowhide, this color is not recommended for heavy use areas like seating, but great for accents or vertical applications.

I could see this more in fashion, like on a purse, or shoes, not so much furniture, however I could also see it utilized in some holiday decor, such as combined with blue and silver themed Christmas decor, as accent and accessories. 

Brushed Metallic Cowhide
Old Penny BM-8357
Looking for something that can be used in upholstery?  This chair is a great example of why I am now loving metallic leathers.  This chair is done in the Brushed Metallic Cowhide in the color Old Penny.  It has that subtle sheen that you would expect on say, and old penny, and it is sure to be an eye catcher when walking into a room.  I love it!  I really want a giant overstuffed leather chair in this color, in the corner of my bedroom to curl up with the Kindle, or write a blog post or two.  

This particular leather is Hand Rubbed to accentuate the metallic finish and the leathers own natural characteristics to create that patina that looks like the chair is your favorite.  

Townsend Leather also has some interesting textured metallics that can be used in upholstery.  The Aniline Gaufrage Cowhide pictured below is a breathtakingly luxe leather that looks fantastic on these chairs.  This photo below is the reason I wanted to write this post.  I love this transitional luxe vignette is exactly the kind of room I love creating, and can't wait to partner with Townsend Leather in creating these unique pieces.   Want more?  Check out the rest of my blog.  You can also find Townsend Leather on Pinterest


Wednesday, September 24

Fall Tablescapes and How to Create Them


Thanksgiving is just around the corner, so what could possibly be a better post, than setting that amazing feast table?

So, let me tell you a little about me, and my family when it comes to holiday feasts, we are the poster child for lazy meals.  We load up the island and treat it like a big buffet, if you want to eat, get off your butt and grab a plate.  There is nothing on the table, because the more you put there the more you gotta clean up.  You will only find the things that are required, a glass for your one beverage of choice, napkin, and a fork.  I wouldn't know the proper way to set a table if it killed me.  So when I got married, I was surprised to see that there are actually people who know how to set the table.  Can look at a place setting and know exactly which bread roll is theirs, and which wine glass is theirs.  This concept is completely foreign to me.  So this is one reason I wanted to write this post, help the sisters (like me) out there throw an amazing holiday feast, with a properly set table that looks amazing.

Lets start out by the place settings themselves.  What goes where?  I learned an awesome trick at a wedding once.  If you make that "OK" symbol with your hands, link the index and thumb, your Left hand makes a "B" and Right hand makes a "D", bread and drink!
I found this diagram which is an excellent display of what goes where. When dining, you will use your utensils from the outside in. It is somewhat obvious since your salad fork is on the outside, followed by dinner, then dessert.  There isn't much more I can talk about here, the picture pretty much explains it all. 

Now that we have that figured out, lets go over some amazing fall tablescapes to get you inspired for your holiday entertaining. Now if you don't already follow my Harvest Season Board on Pinterest, you should. I have some amazing ideas for tablescapes from fun and festive to formal and ornate.  There truly is something

Contemporary Table  by
Focal Point Styling
This tablescape features one very necessary element to any tablescape or vignette you can create, and that is layers.  If you notice, they used a square charger, large plate, napkin, small plate and then the pumpkin.  Creating layers is a great way to also show different textures.  Just like in this display, the plaid plate, golden pumpkin, and then the rattan textured charger.  They all blend well with the table runner and leaf detail on the candlesticks.

When creating your perfect fall table, start layering right there in the store.  Play with the plates, linens, and decorative pieces to create a look all your own. Play with shapes, textures, and like this design, even various prints.  "Matchy Matchy" has it's place, and so does eclectic and fun, shown here.
Also, when trying to recreate this look, Home Goods is my favorite place to shop.  They have great prices and selection.

White Pumpkin Table Scape by
Ann West Interiors
Want to play it safe, or still not sure what to do with textures and patterns?  Try something like this tablescape by Ann West Interiors.  She created a table scape by simply placing white pumpkins of various sizes and shapes down the center of the table.  The use of white candles of various heights creates even more stunning interest.  The hurricanes with candles and leaves create height.

When looking for pumpkins, consider foam craft pumpkins, that can be used year after year.  Fake not your thing, often you can find them in bulk at places like grocery stores, home improvement stores, or of course, your local pumpkin patch.

Glittering Table by
HGTV
This amber tablescape by HGTV features similar colored glass ornaments including stemware and accent pieces, candles, and foliage.  A lovely table setting that is both classic and timeless.  This scape can also be done year after year, and tweaks in foliage, can also be used for Christmas.
A tablescape like this can be easily created using pieces from Pier One, or even Crate and Barrel.  Be careful with the amber colored dishes and shopping multiple stores.  Some might be more yellow, and some more orange.  You want it to match!

When creating your look, shop around.  This can get expensive.  Especially if you need to create many place settings.  This is one reason why I love places like Home Goods, Marshall's, and Ross.  They often have some great pieces and very affordable.  The biggest challenge at these stores will be finding the quantity you need, again if you have a lot of place settings.
Enjoy, and again, follow my Harvest Season board on Pinterest for even more How-To's and inspirational photos. 

Wednesday, July 2

7 Kitchen Trends to Avoid


Everyone always focuses on the newest best trends, but what about the trends to avoid?  I have seen a few lists, so I decided to make my own, and focus on alternatives.  Obviously, if your dead set on something, get it, but if resale is at all a consideration in the next year or so, think twice on some of these items. 
Appiance Garage
by Case Design

1: Appliance Garages.
What was once a great way to hide those counter top appliances like coffee makers, toasters and blenders, is now a dated and gone element of any kitchen.  In today's kitchen, counter space at a premium, so why hide it inside of a cabinet?  Instead of an Appliance Garage, opt for a pantry to store some of the smaller less used appliances.  If that isn't an option, deep drawers, or roll out trays inside of a base cabinet is a good alternative.  This will help open up that extra counter space, and give any kitchen a more open look that is desirable in today's kitchen.  

2: Small Splashes.
A great alternative to a small splash
by Esther Hershcovich
Today, most homeowners are choosing full height tile splashes made of various materials of any size.  Gone, forgotten, and hopefully never to be seen again are 4-6" splashes.  I hate short splashes, because dust just collects on the top ledge, and what about that sheetrock above?  If your making spaghetti and that sauce splashes, it's going no where on that backsplash, it's going on the painted and textured wall above the splash.  Trust me, full height is the way to go.  One look I love, is a full height splash, even behind a hood, that goes all they way to the ceiling.  It's an inexpensive and custom touch that is sure to draw attention.

3: Trash Compactors. 
I've said it a million times, ditch the compactor and opt for a double waste basket cabinet with room for trash and recycling.  They take the same amount of space, and you can eliminate the recycling pile on the countertop. They're also cheaper!  

Consider a Micro Drawer Instead
Greenleaf Construction
4: Over-The-Range Microwaves.
Yes, they save space, but they are incredibly dangerous, especially for kids!  They are too high up to safely remove hot dishes if your short, which could cause spills and injury.  Instead, opt for a microwave drawer by Sharp.  Still a growing trend, it's great for any member of the house hold, from kids to grandparents, which relates to a housing trend, of multiple generations under one roof.

5: Overly distressed and Glazed Cabinet Finishes.
Women still love these, but the men are saying "They Look Dirty!"  This has been a marital disagreement since the beginning, and I am glad to see this going away.  Take a look at my previous post on cabinet finishes for 2014 which talks about today's finish trends in the kitchen (and bath!).  Solid colors featuring off whites and grays.  

Very Ornate kitchen by
WL Interiors
6:  Overly Ornate Accessories.
Things like corbels, valances, on lays, and legs that have no architectural reference to the house. Keep in mind, you want the whole house to work as one, this includes architectural elements that don't fit.  These elements were popular in the 1990's, however today's clients are scaling back and keeping cleaning in mind. Now keep in mind, if your entire house is a highly decorative and ornate, then this style is fitting, but if your house isn't, then neither should your kitchen.  It's all a balance.

7: Polished Countertops.
This one is still a pretty strong trend, but I have seen more and more people requesting honed or non-polished materials.  I think this trend is on it's way out, and it's about time.  There are so many different finishes to natural stone that are equally lovely.  Honed, Leathered, Fired, and they all look great.  Do your homework.  If polished is still your cup of tea, great, but you might find something you didn't even know existed. 

Hope some of these ending trends weren't on your wish list.  Again, if they are, there isn't a problem with that, just keep them in mind if resale is going to be happening soon. 


Tuesday, June 24

Three Kitchen Remodel Regrets to Know & Avoid

Most people are completely happy with their kitchen remodel, however sometimes they do have a few regrets.  What are those regrets? It comes down to the basics: Budget, Finishes, and the Pro's.

1: I didn't spend enough money.  
Wait what? You would probably expect this to be the other way around. The truth is, 36% of re-modelers wish they had spent a little more on those things they cut due to budget.  This may frighten you, considering in 2012 the National Kitchen and Bath Association (NKBA) reported the average kitchen remodel is about $47,000, or 10% the value of the home.

So what would they spend more on? Interior accessories and finishes is a big one. Things like Roll Out Trays and added organization features. Upgraded appliances is also a big one, and professionals to get the job done. Many people are overly confident in their abilities and admit they should have hired contractors to do the work for them. 

Now, don't get me wrong, there are plenty of people who regretted spending too much. So what would they cut second time around? One common answer is unnecessary appliances like beverage coolers, trash contractors, and warming drawers. Most of the people who regret spending extra on these items state they would have loved the extra storage space instead of an appliance they rarely use or really need. Many people are regretting the use of a trash compactor versus a waste and recycling cabinet that takes the same amount of space.

2: The Finishes
There are a lot of options when it comes to finishes in the kitchen.  some budget changing options can include going with a semi custom cabinet line versus custom, especially with the wide variety of options and modifications now available.  Many of my clients who have opted for this money saving option have managed to get some of their upgrades for free, like extra roll out trays, all plywood construction, and upgraded finishes like paint.

Other finishes include glazes on cabinets. A trend I personally see on its way out, many clients complain they make the cabinets look dirty. Consider a highlight if you must have the look. A glaze is applied to the whole door then wiped off, leaving residue and some color on the whole door. A highlight is the same glaze, only applied to the detail of the door for a much cleaner look. 

Other finishes include flooring, countertops, lighting, faucets, and hardware. When shopping for these finishes, price shop, compare, and shop around. Cabinet pulls often can cost you $10+ at specialty shops. Often online you can find the exact same knobs and pulls for less than $5. Companies like Liberty sell their knobs and pulls for cabinet manufactures who then sell to cabinet shops with double or triple markup. If you go to Home Depot you can buy the exact knob without the markup from the cabinet manufacturer, saving you a few bucks.

When it comes to the other finishes, still shop around. This is your kitchen, and its a one time thing. Get the best quality for the price, and have a few backups! Look at big box retailers, mom and pop shops, and everything in between. Trust me, you wont hurt anyone's feelings if you do, in fact, they already expect you are shopping around.

3: The Pro's
Hiring a pro is like hiring an employee. In fact, they are your employee. Remember, they work for you, and you are a team. Have interviews with multiple pros. If you are working on a full kitchen remodel, you need to consult a real Kitchen and Bath designer.  Not an Interior Decorator, not an Architect, but a Kitchen Designer. We all know my feelings on certification. There are thousands of amazing designers out there that aren't certified.  (Its an expensive test that takes away time from work and families to study and prep for. So don't discredit a  designer for not having fancy letters!) Interview them, get to know them, because they will make your life easier over the next few months. Think you cant afford one? Most big box stores like Home Depot, Lowe's, and Menards offer the service free. Granted sometimes the designers aren't the best trained, so look for experience,  longevity, and professional training like college. Shy away from a designer that has only been the department for a few months.

Another pro is a Contractor. Many home owners think they can do it all themselves, when in reality it isn't as easy as replacing a faucet. Again, get bids and interview contractors. It might be less expensive than you think, and one of those extra expenses many people regretted not investing in.

There is a great commercial out today? With a Doctor mowing a lawn, and a landscaper performing surgery. Professionals do this type of work daily and will make your life easier and more enjoyable.  Sometimes the extra investment is worth it's weight in reduced stress and a more enjoyable experience.  

Friday, May 30

8 Myths about Granite Countertops


1. "Natural stone's like granite have radiation and can cause cancer."  Granite is a natural stone.  It's been growing in the earth for what could be millions of years.  According to the Environmental Protection Agency's (EPA) website:
"Any type of rock could contain naturally occurring radioactive elements like radium, uranium and thorium. Some pieces of granite contain more of these elements than others, depending on the composition of the molten rock from which they formed."
While yes, granite and other natural stones used for countertops could contain radioactive gases, its unlikely the gases can escape the stone. According to the EPA's website,
"granite is generally not very porous, less radon is likely to escape from it than from a more porous stone such as sandstone. It’s important to know that radon originating in the soil beneath homes is a more common problem and a far larger public health risk than radon from granite building materials. Also, any radon from granite countertops in kitchens or bathrooms is likely to be diluted in the typical home since those rooms are usually well ventilated."
So, while yes this building material does have radiation present, but because of the well ventilated areas and minimal amounts, you will be fine.  As I have told many of my customers, there is more radiation in the world around you. Get the counter top your going to love everyday for the next twenty years!  To read more from the EPA's site, click here

2. "Granite is heat proof!"  No, no it isn't!  Many granite shops will tell you anything to sell a counter top.  They are depending on you to give them your hard earned cash so they can make their mortgage, car payment, or pay for their child's comp soccer.  I am here to tell you the facts, and this is one of my biggest pet peeves.  According to Consentino, one of the biggest suppliers of granite and quartz surfaces states:
"Like all natural stones, natural Granite is subject to thermal shock.  Thermal shock is the sudden change of surface temperature.  It is recommended that you protect your countertop surface from direct heat sources by using placemats, coasters and/or trivets"
So what does this mean?  Thermal shock can cause the stone to crack.  And I am not just talking granite, I am talking all natural stones, and most of the man made ones too, yes, this means you quartz!)  I tell my customers to always use hot pads or trivets.  This even includes the use of hot pads and trivets under heat producing small appliances like crock pots, rice cookers, electric skillets, etc.  So protect yourself and your investment.  Use a hot pad!

3. "Granite wont scratch, so I don't need to use a cutting board."  Yes, your are right, for the most part.  Under normal everyday residential use, the stone shouldn't crack. But like I tell my clients, use a cutting board.  You won't scratch the granite, but you could destroy your Henckel knives.  For the most part, granite is one of the hardest surfaces, scratched only by diamonds or other harder stones.  So if you have a nice set of diamond blades, guess what, you can scratch it.  So again, protect yourself and your stuff, grab a cutting board at Home Goods and chop away. 

4. "All granite requires maintenance/sealing every few months."  Yeah, ten years ago!  Along with cell phones, TV's, and everything else, technology has found it's way into countertops.  They now have a way to bake in a permanent seal into granite.  It is up to you to do your shopping and homework.  Major granite outlets have granite that comes pre-sealed, but make sure the granite comes with a warranty to back up the claims.  (Remember, some shops will tell you anything to make the sale!)  If the granite you want doesn't come with this new technology, don't worry, it's not the end of the world.

Invest in a good sealer.  My personal favorite is called Miracle 511 Impregnator (great name for a sealer right?).  This sealer works much like the baked on sealer, but you can do it at home.  I even recommend using this product after most of the 15 year warranties run out on the pre-sealed stones.  Natural stone is porous, like your skin.  Most inexpensive sealers act like a saran wrap barrier over the stone.  Every time you clean the stone, you are wearing away at that thin layer, causing holes that can let through stains.  The Miracle product actually seeps into the pores of the stone, leaving the sealer in the pores, keeping it out of the cleaners way, and not allowing anywhere for the wine to seep in.  When applied properly, Miracle 511 Impregnator can last up to five years.

Even better, want to know how to tell if your granite needs to be sealed?  Pour a little water on it, in the heavy use areas, like the sink and the cook surface.  Let it sit for ten minutes, then wipe it away.  If a dark spot remains, then it needs to be sealed.  If not, then your good to go. Be careful and test a few areas, just to be safe.  

5. "Granite wont chip or crack."  Sure, granite is a super hard product, and hard to damage.  You should see the machines they use to cut it up to fit your kitchen.  However, think about it.  If you drop a cast iron pan on the edge of your granite, guess what, a chip is coming.  Just scroll Pinterest and see all of the pins on how to repair a granite chip.  As for cracking, aside from Thermal Shock (read above), cracks can happen.  Natural stone has natural fissures and hair line cracks.  That is one reason why some stones have a mesh backing glued on the back, for added stability and strength.  If you hit any of those fissures just right, or stand on it unsecured from below, it can crack.  Again, search Pinterest, there are a million pins suggesting ideas on how to repair cracks and chips.

6. "Natural stone is very expensive." Yes it can be, but there are a million way to get it at a bargain.  Just be cautious.  Bargain granite's can have more of those fissures, and can require more sealing. In all actuality, recycled glass products and quartz tops are often more expensive.  Also, acrylic tops are often not much less, I am talking a couple bucks a square foot.  So get quotes, price it out, and get what you love. 

7. "Natural stone will loose its shine."  This depends on the stone.  With proper care and maintenance, granite won't loose it's shine, but marble will.  Marble is going to patina with age.  This is one of the things I absolutely love about i.  The polish can always be reapplied with a quick trip to the hardware store, or a call to a fabricator.  Or, if you leave it, in a few years, you will have an amazing looking marble.  

8. "Natural stone can harbor bacteria."  As we discussed before, natural stone is porous, and without proper sealing, those pores can hold bacteria.  Protect yourself and your family, if your stone doesn't come pre-sealed, keep it sealed. 

Monday, April 21

5 Must Have's for Your Next Kitchen

Technology and trends are changing constantly, and that is especially true for the kitchen.  Not only that, but semi custom and custom cabinet manufacturers are coming out with new space saving options for nearly everything.  From charging stations to toe kick drawers, there should be no excuse for wasted space. In today's kitchen, there is a place for everything!  Work with your designer to come up with solutions for even the most random of items you have.

LG Steam Dishwasher with 3rd Rack
1: Utensil Drawer in the Dishwasher!  Some dishwashers have a 3rd rack which is great for utensils like spatula's and some of those larger utensils.  I love them.  In my older dishwasher, I often have to take an entire row of glass storage for spatula's and large wooden spoons that won't fit below in the silverware rack.  This feature is on the top of my list for my new dishwasher. 

Tall Message Center by Diamond Cabinetry.
2: Charging Stations are great for any kitchen.  Since houses are moving more and more towards tech products, why not have a charging station in the kitchen.  A place for cell phones, iPods, tablets, camera's, etc.  They all need to plug in, why not in the hub of the home, the kitchen. This great cabinet by Diamond also features a message center with a whiteboard inside the cabinet door.  Great for messages, calendars, and more. 

Toe Kick Drawer
3: Toe Kick Drawers are an amazing out of the way storage solution.  Great for linens that aren't sued very often, serving platters, cutting boards and cookie sheets, all that big and bulky stuff you don't use often.  The drawers can also be equipped with food and water dishes for your furry family members.  With today's semi and custom cabinets, there should be no reason for wasted toe kick space. 
 
Belken Kitchen Cabinet Tablet Mount
4: The Belkin Kitchen Cabinet Tablet Mount is a must have.  Tablet's are taking over homes, and are a great resource while cooking and in the kitchen.  You can place your tablet on the mount and keep it clear of food and messes while using video's and recipes.  For $34.19, this is a must have.  You can even use App's to build shopping lists and so much more.

Waste/Recycling Center by American Woodmark
Kitchen designed by Sarah George at
Home Depot of Folsom, California
5: Trash compactors are out, especially with the growing trend of recycling, and great recycling programs provided by cities.  This great waste cabinet is hidden away, and takes the same amount of space as a compactor, however gives you the flexibility to have both space for trash and recycling.  I try to put this cabinet in every kitchen I design, and every client has been blown away by its convenience.  Ditch the compactor!

Wednesday, November 20

Islands Designed for Entertaining

A few days ago, I asked my Facebook fans what they wanted to see in their kitchen. Given anything they wanted, budget not an issue, and one of the answers was a no brainer, a grand island designed for entertaining and functionality.
So here we go, what amazing island features are required for entertaining guests both beautifully and functionally. I had to make a list. 
  • Storage
  • Seating
  • Counter Space
  • Appliance Storage
  • Sink
Islands can be both stylish and functional, and can easily be attained with the help of a Kitchen and Bath Designer. With storage needs in mind, an island needs to get the job done. What are your wants, needs, and requirements? It is best to work with your designer and cabinet manufacturer to design the ultimate utilization of space, and to achieve your needs and wants as best as you can with the space you have.  Your designer can look at the space and tell you what size island will fit in your kitchen, and can help you prioritize your wants and needs.

Mediterranean Style Kitchen by
Vanguard Studio Inc
When seating is required, consider the size of the space and how many you want to seat. Comfortable seating typically is 30" wide. So if you have a five foot island, expect to seat two on the long side. Again, work with your designer to make the best use of space. You don't want to make narrow walkways around the island in order to seat one extra body. If you can only have a small island? Consider seating on two sides.

Many people come in wanting a three tier island. This is fabulous if you have the space.  Keep in mind, different height countertops will require support.  Whether it is additional cabinets, corbels, or even a pony wall.

The different counter heights are standard.  Bar height countertops are excellent for standing or casual seating. They are 42" above the finished floor. Next you have the work surface, which is the same height as the rest of the countertops at 36". Then there is dining height which is 30," excellent to take place if a dinette table. If you are looking for the most counter space, making the island one level is the best way to give you the most unobstructed workspace. 
There is a wide variety of under counter appliances excellent for islands. Islands are a great place to store some of those extra appliances. No need for an over-the-range microwave when you can use the Sharp Microwave Drawer. Locate a cooktop and a grand hood above, or even a telescopic downdraft. The options and possibilities are endless. Islands are also an excellent way of hiding beverage coolers and wine refrigerators. Why not clear some of the space out of the refrigerator?  

And the last thing that may be on your list, a sink. Whether its the main kitchen sink or possibly a prep sink? Both have their home in the island. If the main sink is perfect for the island, be sure to leave room for the dishwasher, and possibly a waste basket cabinet. If a prep sink is more your style, then be sure to place it at one end, to keep that counter space as large and open as possible. You want to leave it as open as you can for rolling out dough or whatever project you have going.
Islands are a blank canvas, your only restriction is the size, the want and need list, and your imagination. So run with it. This is the best place to truly set your kitchen apart, and entertain the best way you know how....and equipped for the job. 


Wednesday, September 25

First Home Remodel Realities

Congratulations,  you just bought your first home. It's not new, but it is definitely new to you. No more crummy apartments, or worse, your mom's spare room! This place is yours, all yours. Every last bit, the outdated kitchen and light fixtures, down to the stained carpet and scuffed up walls.  So you now have a remodel project and a depleted budget. What do you do?
Unlike my previous posts on kitchen remodel phases, remodeling a house in phases is totally different. Especially if you just moved in to someone else's filth. (I know, I did it in March of 2012 while six months pregnant!). So what do you do and when?
I still stand by my top down mentality, however, I am going to throw a giant wrench into your plan. After all, remodeling a house is a science, especially when your on a budget.  When your living in the house, and putting up with the mess day in and day out, the "science" has some pretty big variables to keep in mind.  And especially when the house has been poorly maintained and quite possibly a hazard to your health.  How can a house be a hazard?  Simple, lead paint, asbestos, or even remains of pet waste that has soaked through the flooring.  That can be a hazard to your health or your families!
What are your top priorities? 
No really, I am being serious! Don't tell me the outdated but fully functional kitchen is your top priority.  It works, yes the cabinets are golden oak and the appliances are a rainbow of available colors.....but it all works perfectly fine, and gets the job done. When I talk about priorities, I am talking about things like that urine soaked carpet covering the entire residence,  the holes in the doors, the broken ceiling fans, asbestos in the linoleum, these priorities. The ones that for health and your sanity, should be fixed right away.  You wouldn't want to spend your remaining budget on a kitchen full of stainless steel appliances, when the flooring is saturated in cigarette smoke, and the single pane windows are letting all your air conditioned air out!
When I got the keys to my house, the entire floor was covered in carpet that was soaked into the slab with dog urine.  Not to mention the chain smoker who lived there prior to us, leaving a film of residue over every wall and the ceilings.  So while yes my 1986 oak kitchen with three colors worth of appliances bug me, the floor is a health thing. Remember, I was pregnant.  We spent the majority of our fix up budget on getting the house healthy for myself, and the new member of our family. 
It is all about priorities and budget. While typically yes, you want to work from the ceiling down, you need to prioritize health and must fix asap issues, before you fix cosmetic ones.
How long are you going to stay in this house
Again, I know your a single gal living in a 2 bedroom 1 bath condo. You can't honestly believe you are going to be there until your 60 right? Our house is a 3 bed 2 bath duplex. I have one kid already and know at least one more will be coming in a few years. The schools around here SUCK! I don't see myself living here ten years from now. So think about it, honestly! Why spend $30-40,000 on your dream kitchen when your not even going yo be there to enjoy it? Take a page out of my book. I painted my cabinets. My 1986 honey oak cabinets are now a dark shade of almost black brown. New hinges and hardware, looks like a brand new kitchen. I am sticking with the awful tile and array of mis-matched appliances until they die! Why not right? Rustolium makes a great kit, Cabinet Transformations. $300 and you have a brand new kitchen sistah!
Again, be honest with yourself. That's the best way to truly be happy with your new investment.  When fixing up that fixer upper, it is best to take your heart strings out of the equations, and think about your upgrades and updates as a business investment, since after all, it is an investment.  If done wrong, or poorly, you could end up wasting your money!
Here is what I spent my money on!
We spent about $10,000 fixing up our home, trying to get it livable.  Here is what we did:
  1. Flooring through out. We got laminate flooring through the majority of the house, and carpet in the three bedrooms.  The tile in the two bathrooms worked out well, so that is the only flooring we kept.  We had Home Depot install the flooring for us. They had a killer deal, if you get more than 200 square feet of "Special Order" laminate flooring, they will install for $397, plus the whole house of carpet for $99. I picked a color of laminate that looked good with the honey oak, but will also look good once I painted them.  (I already knew the color I wanted to go with, thus working from the top down!)  We also got new baseboards, since the oak 1x2's didn't look pretty!  I also slapped a fresh coat of paint on the fireplace, and painted the mantle to match the fireplace.
  2. Paint and Primer.  I am not a smoker.  If you smoke, that's your business, but I do not want to come home to an ash tray after a long day at work, no offense!  So we ended up priming and painting the entire house, ceilings, trim and all! 
  3. Painted the kitchen cabinets.
  4. New lighting fixtures through out the whole house.  The 1986 fixtures were hideous and didn't put out much light at all! 
  5. Replace the toilets, as I said, this house was filthy!  I didn't want to touch those things!
  6. Install new shower heads in both bathrooms because there weren't any. 

The things still on our list:
  1. Replace lavatory faucets (These are piled up in the closet!) as well as install new towel bars.
  2. Paint the bathroom cabinets and laundry cabinets.
  3. Repaint all the bedroom doors and closet doors (those are piled up in my garage)
  4. Replace appliances.
  5. New counter tops throughout.  (I am working on my husband on this one!)
I hope this helps!  As I have said before, it's very important to get help if you don't know where to start.  A realtor can help you with this, as well as a designer.  You are investing your money, invest it like it's a business, and that is the best way to make your money back.  We sure have, in just 18 months! 

Thursday, December 13

Floating Shelves

This eclectic kitchen was designed by
Tamar Schechner

Many times, a new trend surfaces, and it is either loved or hated, with little room for indifference.  This is true when talking about floating shelves.  Some love the open minimalistic feel of an open shelf in their kitchen or bathroom.  They love the casual appearance of a floating shelf being used as a picture rail.  Others, however, don't want all of their items on display, and out in the open to collect dust, fearing having to clean their dishes before each use, or having yet another ledge in the living room to remove dog or cat hair.  So where do you stand on this trend? 

I believe that this trend is yet another versatile trend, and has it's place in the design world.  While like many trends, this one shouldn't be over used in every space, it is a great look for most spaces.   Floating shelves, when styled properly and accessorized creatively and smartly, are a great accent for any space.  If you pile too much onto the shelf, you do have more to dust (and who wants that?) or the shelf could look overly cluttered.  When it comes to the floating and open shelf, less is more.

This eclectic living room was designed by
Michelle Hinckley 
Styling, or staging, a floating shelf is difficult.  There is a fine line between a bare shelf, and an overloaded shelf.  When stylizing your shelf, be sure to have fun, and try a few things.  This picture rail to the left shows various sizes of photo frames, alternating large and small.  The balance is perfect, and by using the same color frames and mat's, you keep the minimalist feel of the shelves.  By showing various sizes of frames, and orientations of the photographs, you welcome in eclectic design.

Traditional Kitchen designed by
Jane Ellison
Floating shelves aren't just for the contemporary space.  When the addition of corbels or shelf supports are used, they can lend themselves to more traditional designs and chic spaces.  The thicker floating shelves are typically more contemporary, but still look great in most spaces. This traditional kitchen uses multiple cabinetry finishes to add to the traditional feel.  They keep the shelves simple by keeping only white dishes on the shelves.  The shelves are utilitarian by having stacks of dishes, and less displayed features, keeping a comfortable, lived in design.  

If you are looking to stylize floating shelves, take a look through the ideabook below.